Cookie Cutter: Christmas Lights Painting
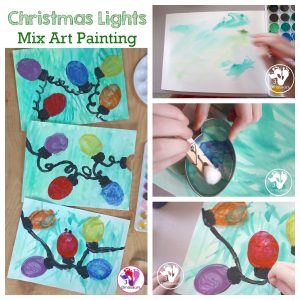
We did some Christmas lights a few years ago and loved it. Today we have a new twist on that painting with a mixed art Christmas Lights painting that different ages can do.
Christmas happens to be one of my favorite times of the year! I really enjoy having new art projects for us to do that add a fun Christmas to the house.
This is simple and easy to do and a mix of ages can do this art project.
We have included links to some of the products and resources we have used with this activity. If you purchase via the links we may earn a small commission.
This is a fun new addition to the Christmas Activities on the site.
I love to pair these activities up with books! Yes, I make my older girls still read picture books. You can build skills by reading aloud to others.
We read the book How the Grinch Stole Christmas! (Classic Seuss). I love the different parts of the story. But I like how it takes all the trees and lights. But then gave them back.
It is fun when you can add a little reading with the craft!
This Christmas painting is a mix of watercolors and paint. You can have loads of fun by mixing the two together to make fun and different paintings
You might also like this grinch slime.
What you need to make the Christmas Lights Painting
- Christmas Lights cookie cutter
- watercolors
- watercolor paper
- washable paints
- q-tip
- paint tray
- clothespins
- cotton balls
- large paint brush

How to make the Christmas Light Painting
There are all the steps we used to make the painting.
Making the Green Background
First, you start off by painting the background in a mix of greens.
We did this by first putting water on the watercolor paper. This paper is great because it has texture and is great for blending colors.

Then we started mixing the greens on the paper.

You can mix and blend the watercolors to make a really unique background. Everyone has their own take on the green and way it should look.

Making the Christmas Lights
Next, we got ready to paint the lights.
We put the paints in our paint tray. We had yellow, red, orange, blue and purple. We decided not to do green. We mixed black and white in the middle to make a dark gray color.
We used cotton balls on clothespins and q-tips for painting.

You hold the cookie cutter in place and then use the clothespin and cotton ball to paint inside the light. You want to make sure you hold is in place but is okay if it moves.

And then we used the dark gray color and a q-tip to paint the end of the light.

Then you repeat this with all the colors you want to use. We did wash the cookie cutters between colors.

In the final part of our painting, we made the string between the lights. I left it up to them how the string would look.

Here is a look at our Final Christmas Light Painting
Check out these other Christmas painting activities
Glitter Watercolor Christmas Lights Painting
Watercolor & Oil Pastels Christmas Trees
Christmas Cookie Cutter Painting
Rudolph The Red Nose Watercolor & Oil Pastel Painting
Check out all the fun Christmas Printables & Christmas Activities on 3 Dinosaurs.
Cassie – 3Dinosaurs.com


